Welcome to my Bugaboo Pinwheel Tutorial!
Today I'm going to show you how to make a Pinwheel!
I learned how to make these at the Ippity booth at CHA.
Once you learn how to create a pinwheel, it is easy to change the sizes of it.
SUPPLIES: Designer Paper (double sided is best), Ruler, Pencil, Piercing Tool and Mat, Scissors, Brad.
STEP ONE: Mark your paper at the width and length of 1 1/4" x 1 1/4".
STEP TWO: Draw lines across your paper with the ruler to make a square.
STEP THREE: Cut square out.
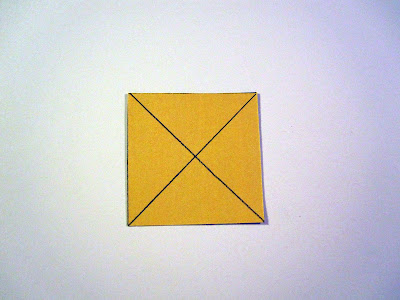
STEP FOUR: Use your rule and draw an X on the back of your square.
STEP FIVE: Cut 1/4" up the lines you just drew. DO NOT cut all the way through to the middle of the X!
STEP SIX: Pierce a hole in the middle of the X.
STEP SEVEN: Pierce a hole on each one of the small triangles. DO NOT pierce it too close to the edge or your when you go to put your brad in, it will tear through the paper. Ask me how I know this information =) Make sure you pierce the tool all the way through the hole.
Now erase your pencil lines.
STEP EIGHT: Start folding each little triangle toward the middle. Put your brad into the small holes on each side of the triangles. Do this for each hole. Then put the brad through the middle hole. It may take some fiddling to get it into the middle hole.
Finished product! Isn't this a fun little embellishment to add to any card or scrapbook page?
Here is the finished card one more time.
Thanks for joining me on my tutorial journey.
Stamps: Penny Doll (Bugaboo), Sentiment (DeNami)
Ink: Black computer, Black (SU), Pretty in Pink (SU) Copic Markers: E 47, 37, 35, 33, 11, 01, 000 Y 21, 11, R85, 83, 81, 20, V 17, 15, 12
Paper: White (N), Lovely Lilac (SU), Regal Rose (SU) DP: American Crafts
Accessories: Large Scallop Circle and Labels 8 Nesties, Border Punch (SU), Window Punch (SU), Pop Up Glue Dots (SU), Glue Dots (SU), Blue Brad (MM), Handheld CirclesPunch (SU),Tooth pick


11 comments:
Jenny--your tutorial is fantastic--and I love your card. I'm going to try this! Great job.
What an adorable card Jenny! Thanks for the tutorial on the pinwheel I'd like to try that!
Absolutley fan-freakin'-tastic tutorial! The pinwheel is just too-too cute and a such great idea for a 3D embellishment! Hmmm. . .that might come in handy later. . .;) MWAH!
FABULOUS post, Jenny!
What a super cute idea to add the tooth pick with the pin-wheel!
Great card and excellent tutorial! :)
Awesome!! Thanks for the tut! I haven't made one of these yet and now I know how!!!!
Thanks!
Maria
Super cute! I really like that cheery striped paper too.
Great idea! Love your card. Thanks for sharing the tutorial. I'm gonna give it a try tomorrow.
Awesome tutorial! :D The pinwheel turned out fab and I love how it spins off the side of the card! Cuteness!!
SUPER CUTE card and a great step by step tutorial :)
Such a cute card Jenny.. Thanks for the tutorial!!
Hi Jenny! Thanks so much for sharing this tutorial with us... I'll definately have a go! Love your card you made with yours... the bright colours are gorgeous! Hugs Shelly ;)
Post a Comment